Make sure you read PART 1 HERE
Where’d we leave off?
Got the bike, stripped it down, cleaned everything. Put the old parts aside. Now, it’s just frame and fork.

Oh, forgot to mention behind the scenes I had to take it to my local shop to get the bottom bracket out. That sucker was seized in there hardcore. I tried with 2 different specialized wrenches and a bottom bracket removal tool, but all I did was start to scratch the frame and ruin the teeth on the bracket – I couldn’t get it. It took them about 15 minutes to figure out how to get it out but eventually they were successful.
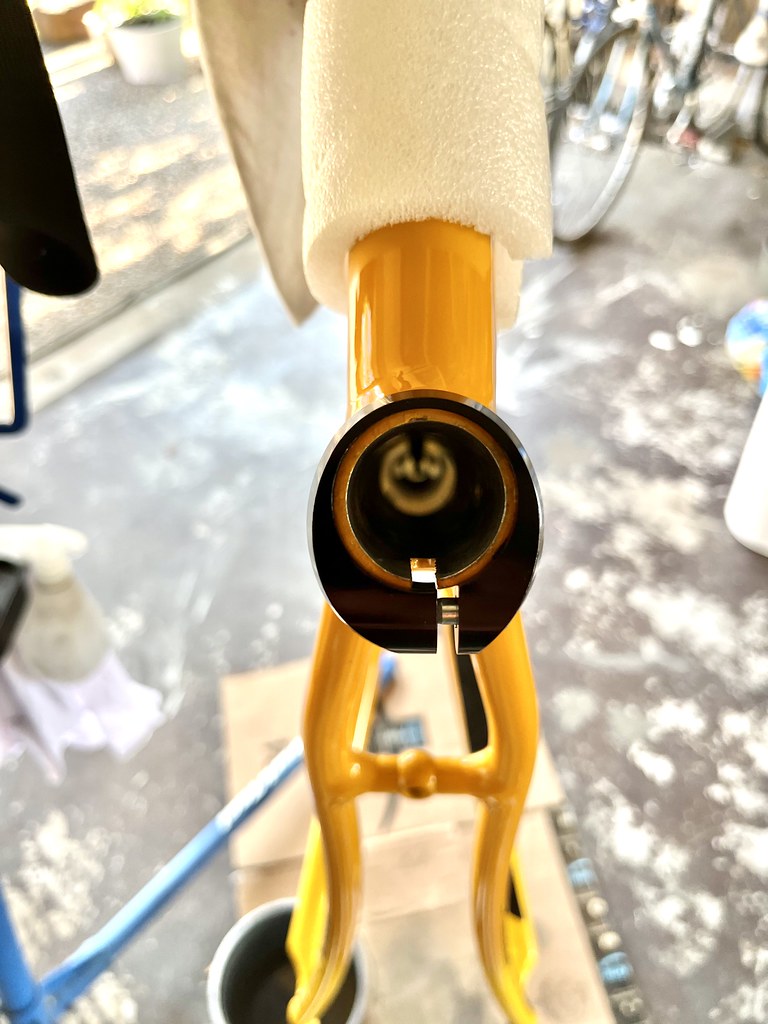
I also popped out the old headset, which also took some “convincing” from a rubber mallet, but such is life with 20+ year old bikes.

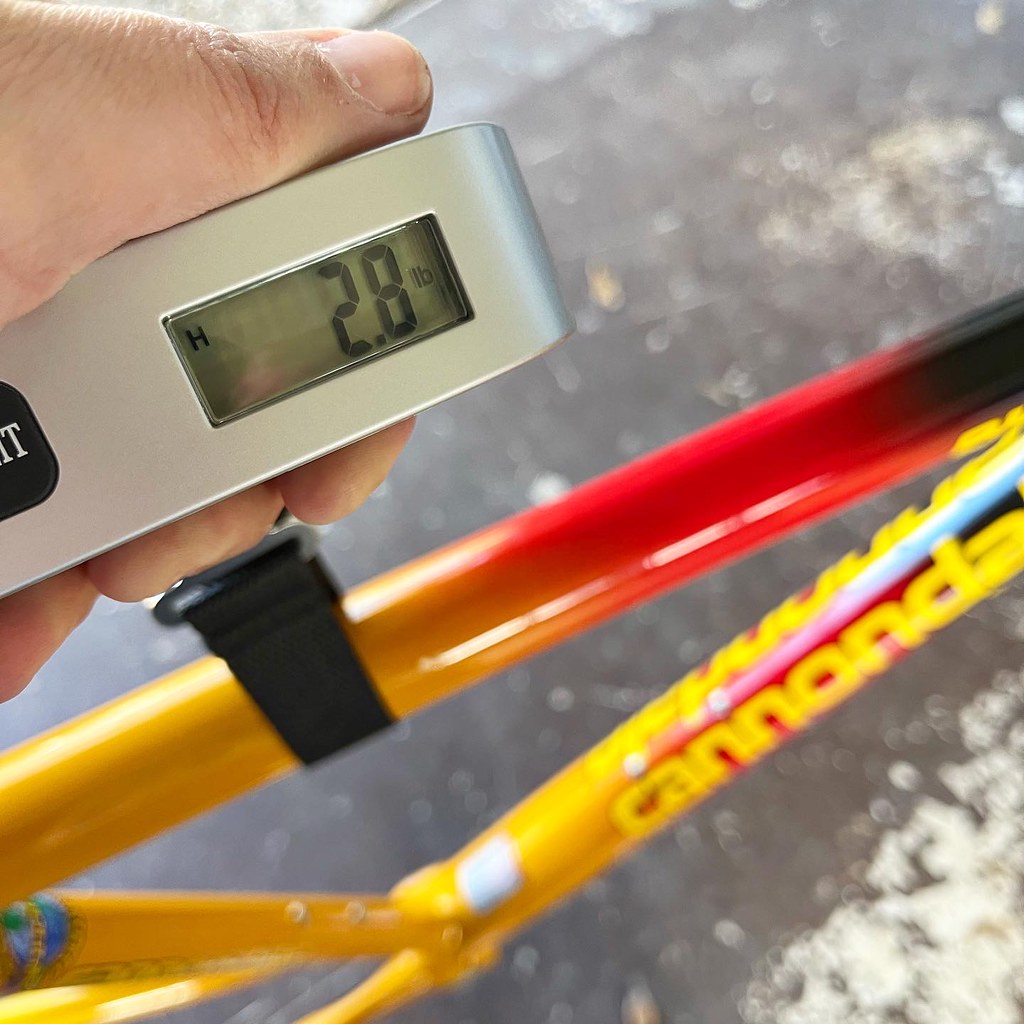
I’m not a weight weenie, but for fun, I decided to weigh everything to keep track of all the parts and see how light I could keep the build. So FYI there’s a lot of scale photos incoming. The frame itself was 2.8 pounds; the fork came in at 1 pound exactly. I can’t find the pic I took of that, so you’ll have to take my word for it. So the frame & fork without any components or parts added was still under 4 pounds, which is pretty great.
So like I said in part 1, bike parts were a bitch to find over the course of the pandemic. And what you could find had probably doubled in price. That’s why I sat on this frame for almost 6 months before I couldn’t stand it anymore and started hunting all over for parts. I bought what I could from local shops (always support your local shops!!) and the rest I scoured the internet for. I ended up ordering stuff from about a dozen different shops with an online presence, some from Amazon, and some from eBay. Some parts were on backorder and some came from the UK. It took a while, but things eventually started rolling in.
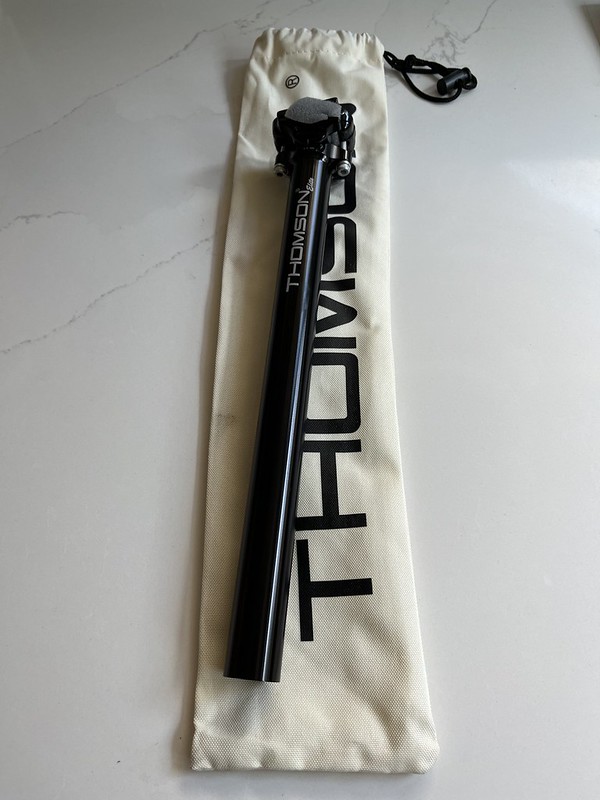
My goal was to pimp out this bike as much as my wallet could support and that meant Shimano 105 (the groupset of the people!) and a mixture of other components leaning toward the mid-high range of things. I splurged on a few things, but mostly I stayed on target and didn’t empty my bank account. Taking part of the yearly tax-refund also helped a bit. I already had a Shimano 105 FC-5800 crankset sitting like-new in the parts bin. It was a birthday present from a few years ago that never made it onto my Specialized Roubaix before that frame cracked and then I sold the warranty replacement frame because I hated the color. So, while it wasn’t the newest, it was only one model year back and it would save me $200. I also already had a Thomson Elite seatpost ready to go – but it was the setback version and I wasn’t sure if it would work. So that’s where I was starting.
Let’s dive in…
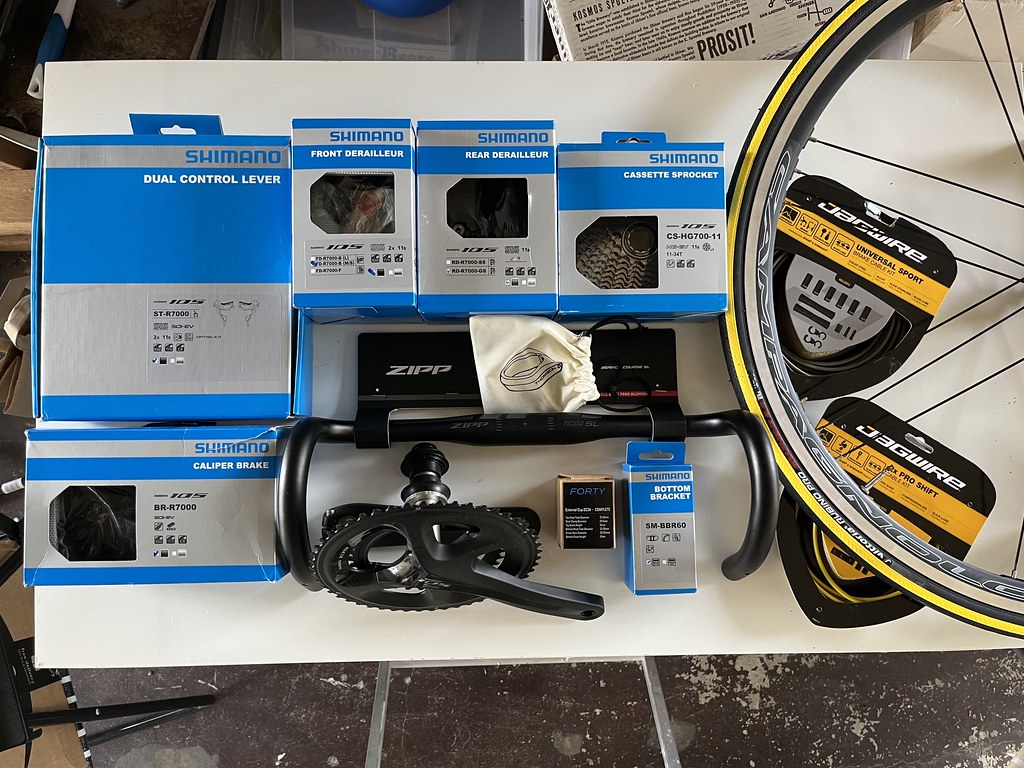
I first ordered some smaller bits since they were more available and not as pricey; a new headset, bottom bracket, and seatpost clamp.
HEADSET: Cane Creek 40 (EC34/34)
There wasn’t anything wrong with the existing Cane Creek S2 headset, but I wanted everything updated and looking as slick as possible. I certainly wasn’t ponying up the cash for a White Industries or Chris King headset (no matter how boss they are). So, I didn’t think twice about coming back to Cane Creek for their excellent stuff.

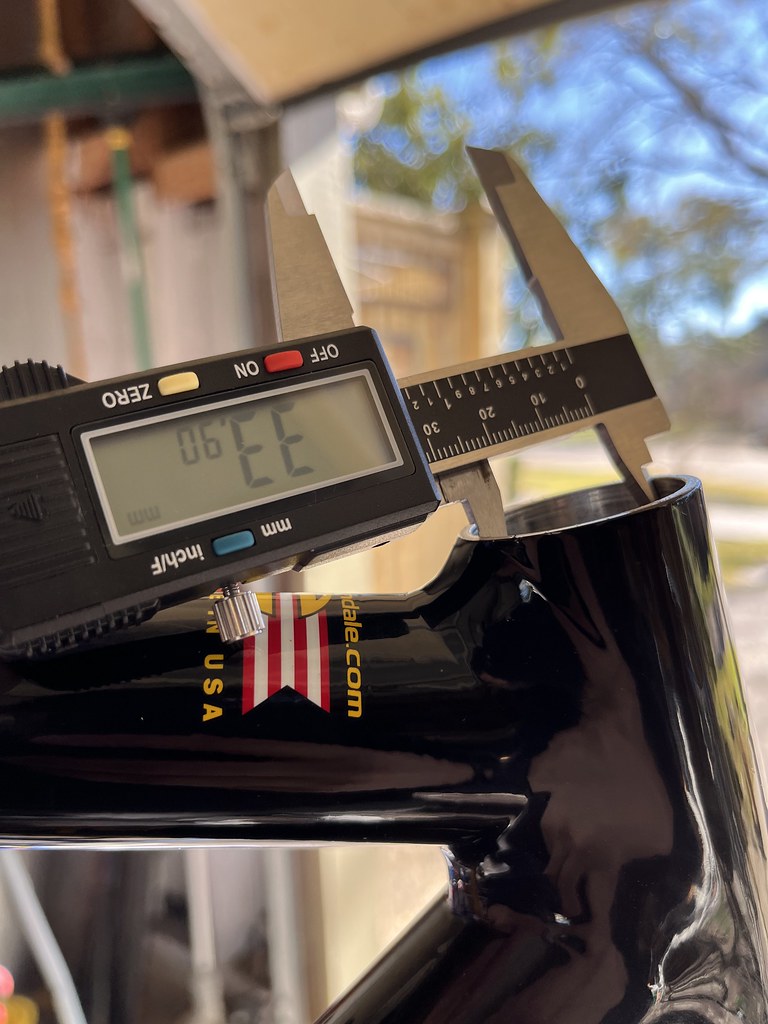
I settled on a their mid-range headset, the “40,” as it was the best bang for the buck. While the R-series frames switched from a 1″ threaded headset to a standard 1 1/8″ threadless in 2000, this was before things got fancy with modern bikes and their tapered headtubes, and zero stack or integrated headsets. So I needed a standard, dare I say old school?, external cup headset that fits a 34mm diameter headtube (that’s what the EC34 means).


While there wasn’t anything wrong with old S2 headset, I didn’t love how it looked. The top cover & race were very pancake-y looking and hung over the profile of the headtube too much for my very critical aesthetic eyes. While obviously the frame limitations wouldn’t allow me to be low-profile, zero-stack, the 40’s shape got me a little closer to the best I could expect. And even though it’s been 20 years, as you can see from the above pics – they weigh about the same (old on left, new on right).
My buddy has a Park Tool headset press so I went over to his garage for a little assist. He’s a bigger bike guru than I am so he’s got a ton of fancy tools


It went in easy-peasy. Once I came back home I would put the bearings in, and the covers and fork – though it wouldn’t stay put until I’ve got the stem on there.
One thing I couldn’t do myself (well I could but didn’t want to take the chance) was get the new crown race installed on the fork. Another part that takes a special tool I don’t have – though plenty of DIY folks will say use a pipe or something. I brought it over to a local shop and they were happy to oblige; see pic below, along with some more headset assembly pics…


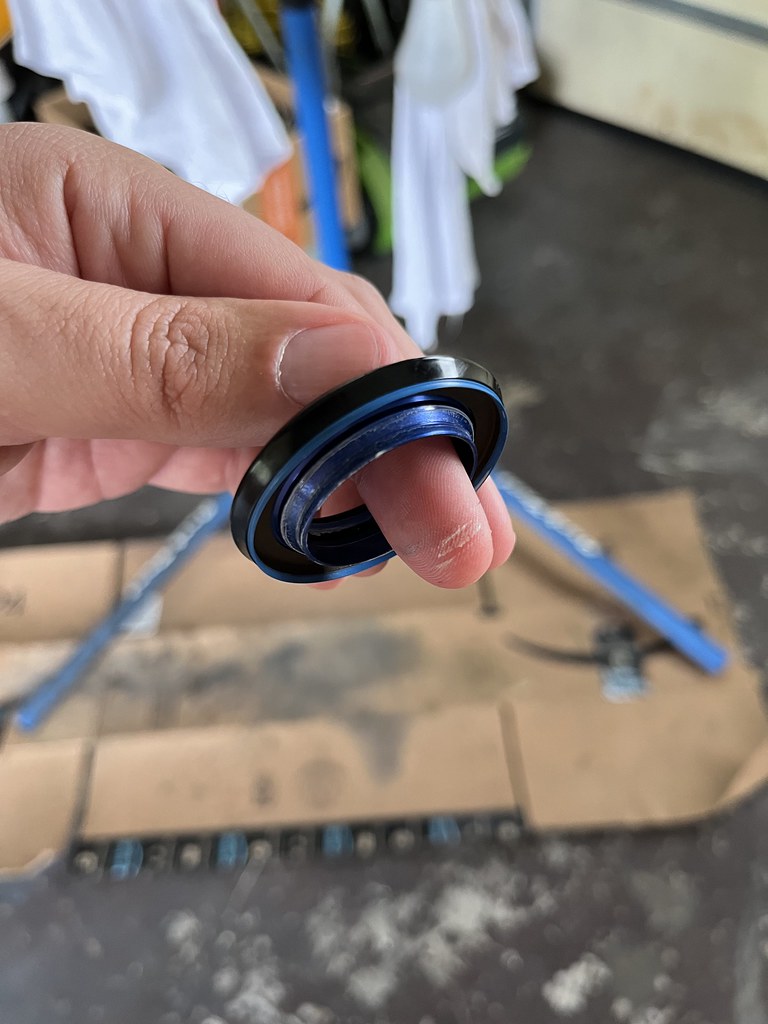


BOTTOM BRACKET: Shimano SM-BBR60
The old bottom bracket was a sealed bearing Octalink version – which Shimano has since retired. It’s similar to a traditional square taper, just a different shape at the attachment points of the BB & crank arms. It’s a threaded BB, and thankfully modern BBs come in both threaded and press-fit, but I much prefer threaded because I think they’re just so much easier to work with. It’s also very nice that these older frames can take different kinds of components to really let you customize your build. And many thanks to Cannondale for keeping this a standard 68mm BB shell so sourcing parts was cake. The 2nd pic below shows the dramatic difference in weight & construction between the old and new. The new Hollowtech BB acts as mostly a sleeve for the spindle on modern cranks, so there isn’t much to it, hence the weight difference.
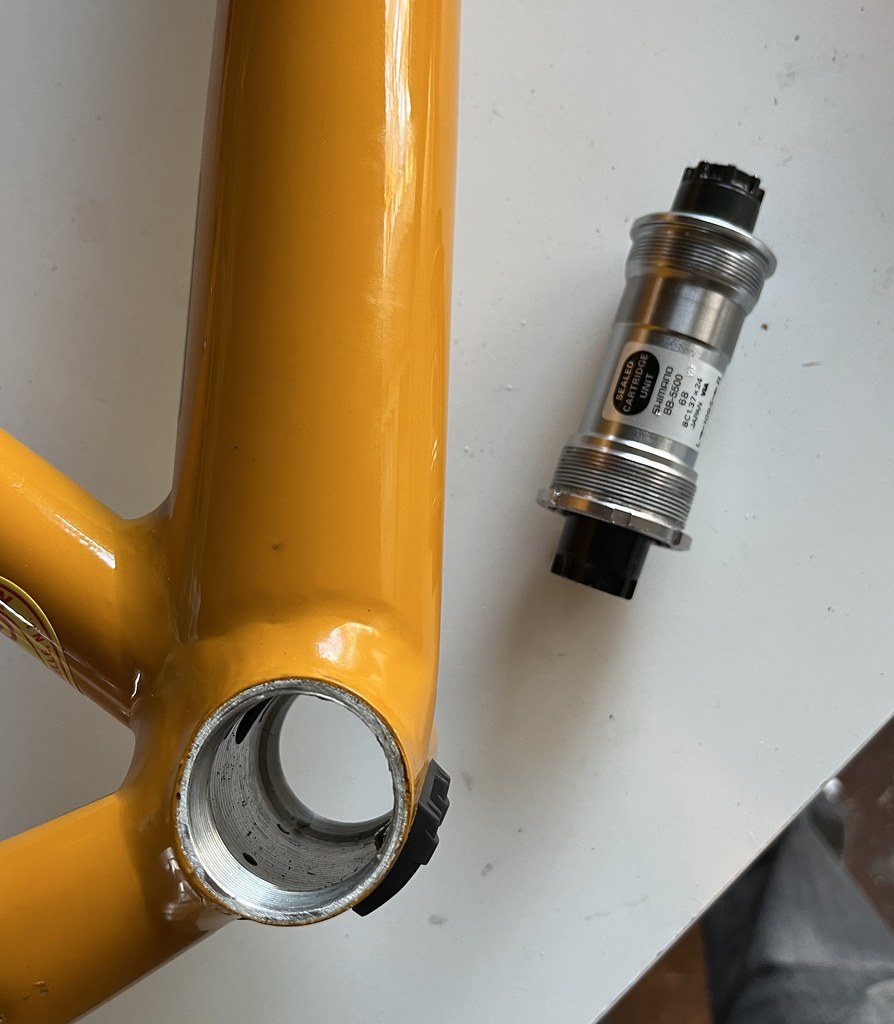

Naturally I had to buy another tool to install it – but these BB tools are small and not too expensive. Plus I got the version that attaches to basically any ratchet wrench. Installation was a breeze – just have to remember the reverse threading! The only major tool missing from my box is a torque wrench, so I wrench ’em down best I can without breaking anything. Don’t forget plenty of grease on those threads!


SEATPOST: Thomson Elite 27.2mm, setback
SEATPOST COLLAR: Thomson 31.8mm
As I said above, I already had the Thomson seatpost so I knew I wanted to have the matching collar as well. Not a lot of fancy things going on with this part – though I was worried that the Thomson clamp was only available in a 31.8mm size, while the original generic clamp that came with the bike was 32mm. Now, .2mm is very small but in a game of wrapping things around other things, every millimeter matters. I checked with folks at bikeforums.net and they assured me it would be fine, so I went for it. Sure enough I was able to slide it on the frame after loosening the bolt enough. I was a little worried about the offset screw not lining up with the gap in the tube, but, still, it works.


Turns out though (future jump here) the setback post turned out to not fit me on this bike – stretched me out too much. Plus, I needed to lower the post because I’m such a shorty and it got to the point where the bend was keeping me from lowering it further so it just wasn’t going to work. Sooooooo…I ordered the straight version after riding the completed bike 3 or 4 times. You’ll see it installed in later pics.
CRANKSET: Shimano 105 FC-5800, 50t/34t, 170mm
Another piece I had in the parts bin was this nearly brand new crank. I’d had it mounted on my Specialized replacement frame, but never rode the bike before I sold it. The 5800 is the previous model, but it’s still plenty great. Plus as I said it saved me like $200. In the future, as money permits, I’ll replace it with the current version, and also go down to a 165 crank arm length, or even a 160mm if I can find one. But for now, this one will do just fine.
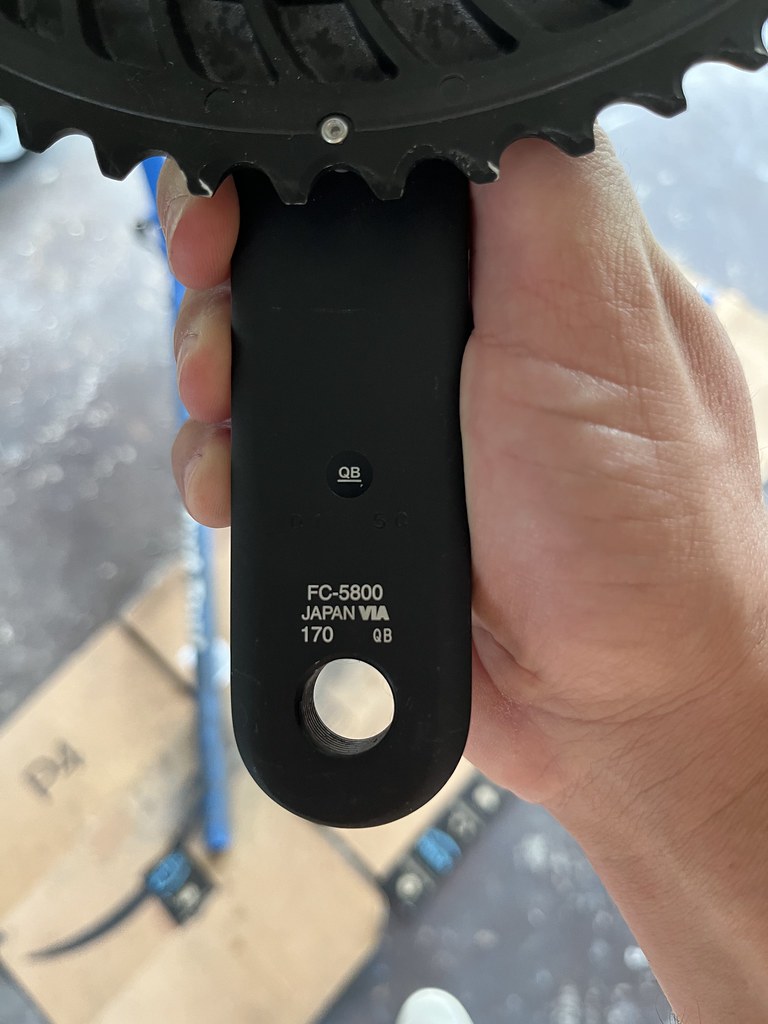
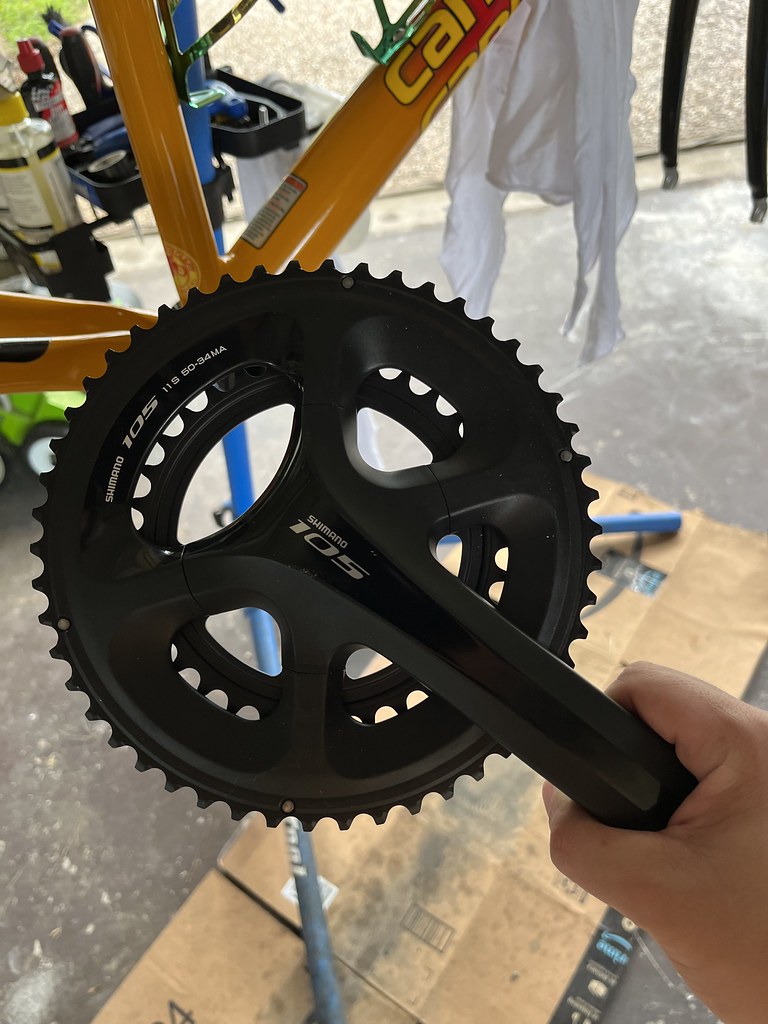

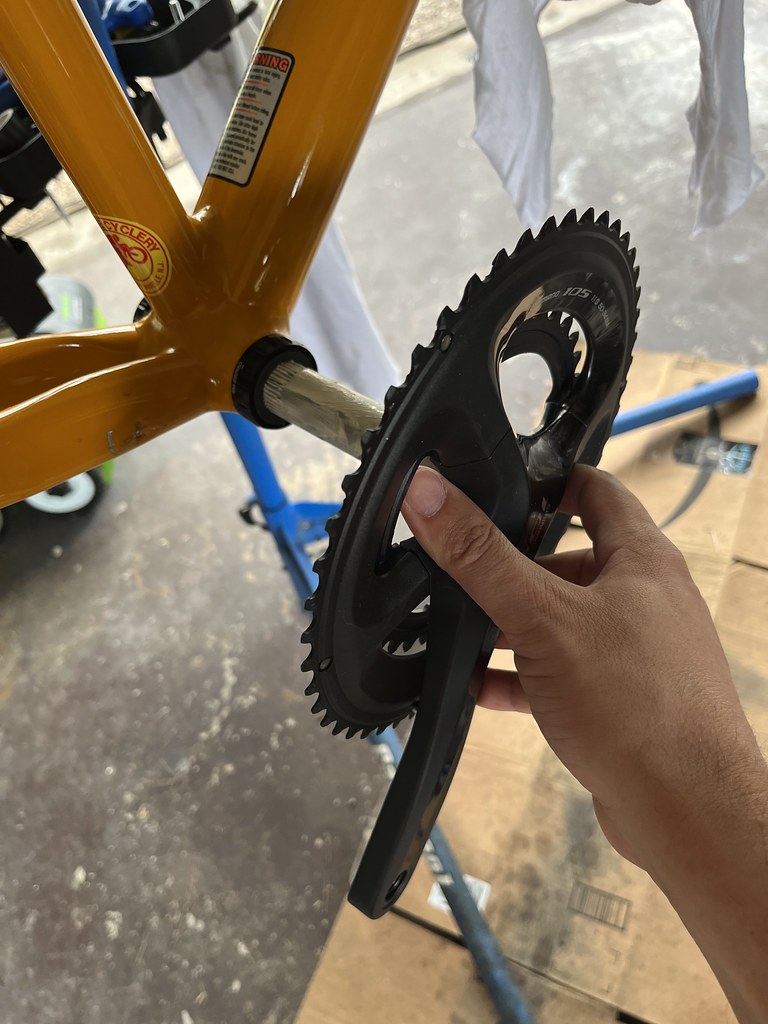
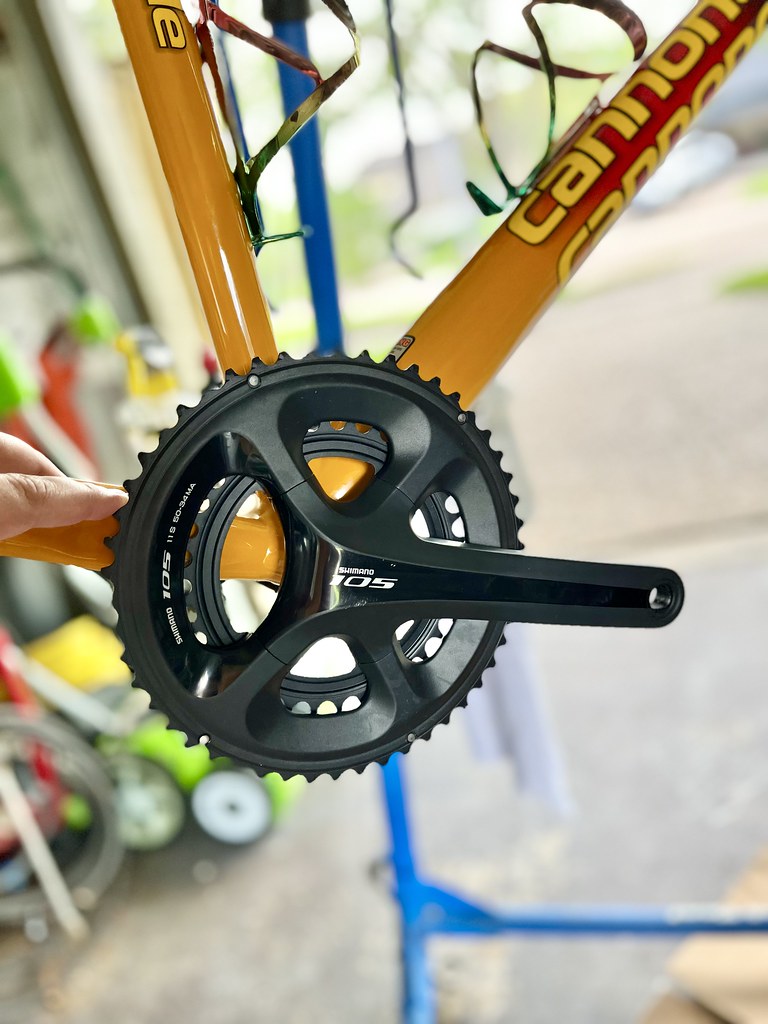
Again, nothing fancy or complicated about installation here. The beauty of that modern bottom bracket is the spindle just slides through, and you attach the left crank arm to the other end. Of course I had to buy another tool to properly attach that crank arm, but, *shrug*. It spins hella smooth.
By the way, in case you’re trying to keep track, so far the weight is up to about 2760 grams – or a smidge over 6 pounds.
FRONT DERAILLEUR: Shimano 105 FD-R7000, clamp, 31.8mm
Pretty straightforward here – I just needed the clamp on version instead of the bolt-on since a lot of these older frames didn’t have braze-ons for direct mounting. I will say getting it aligned with the crank was kind of a pain despite the guide that they provide. I’m not sure it’s as accurate as they anticipate. It probably wasn’t until after I put the chain on later in the build that I got it set up properly.


REAR DERAILLEUR: Shimano 105 RD-R7000-GS
I did a little planning ahead here and had to think about what kind of riding I would be doing with this bike both now and in the future. I already have aspirations of taking this bike out to west Texas and riding up into the Davis Mountains; plus this would clearly be my charity ride bike. And most of those routes have hills. Central Texas has some good climbs; the western mountains have some real challenges; even some roads a little west of Houston have some good rollers. So I decided I wanted to have a cassette with a bigger range of cogs, so this meant I needed the “GS” version of the rear mech – the “medium cage” version that was larger to accommodate bigger cogs.You’ll see more what I mean when I talk about the cassette later.
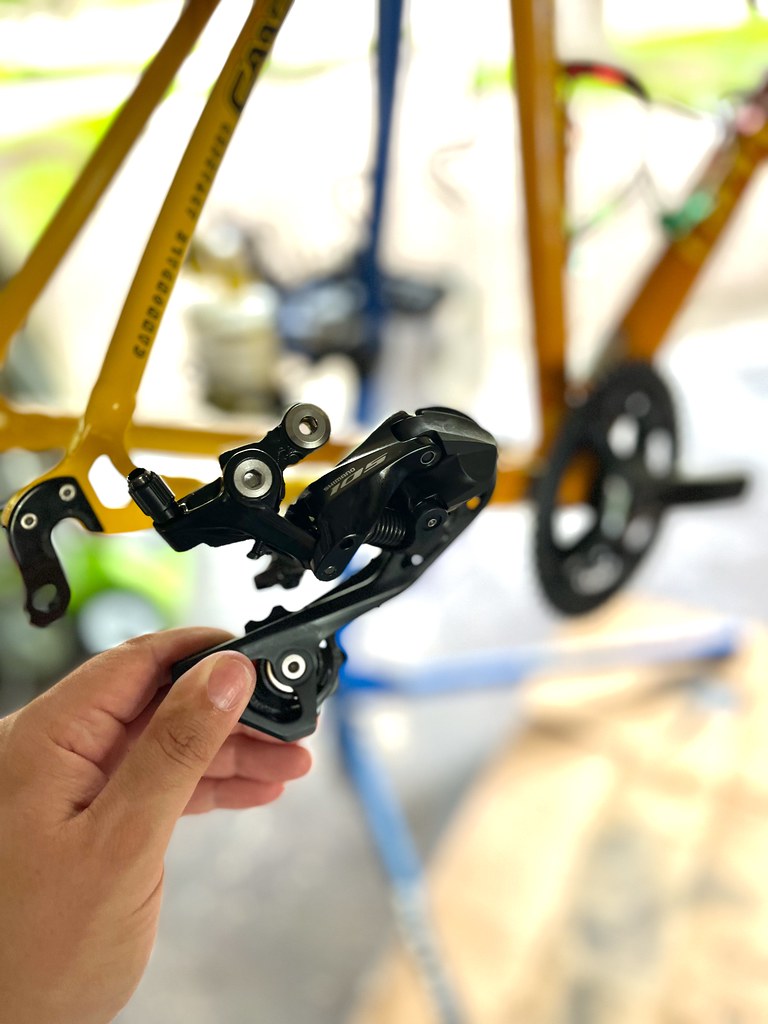
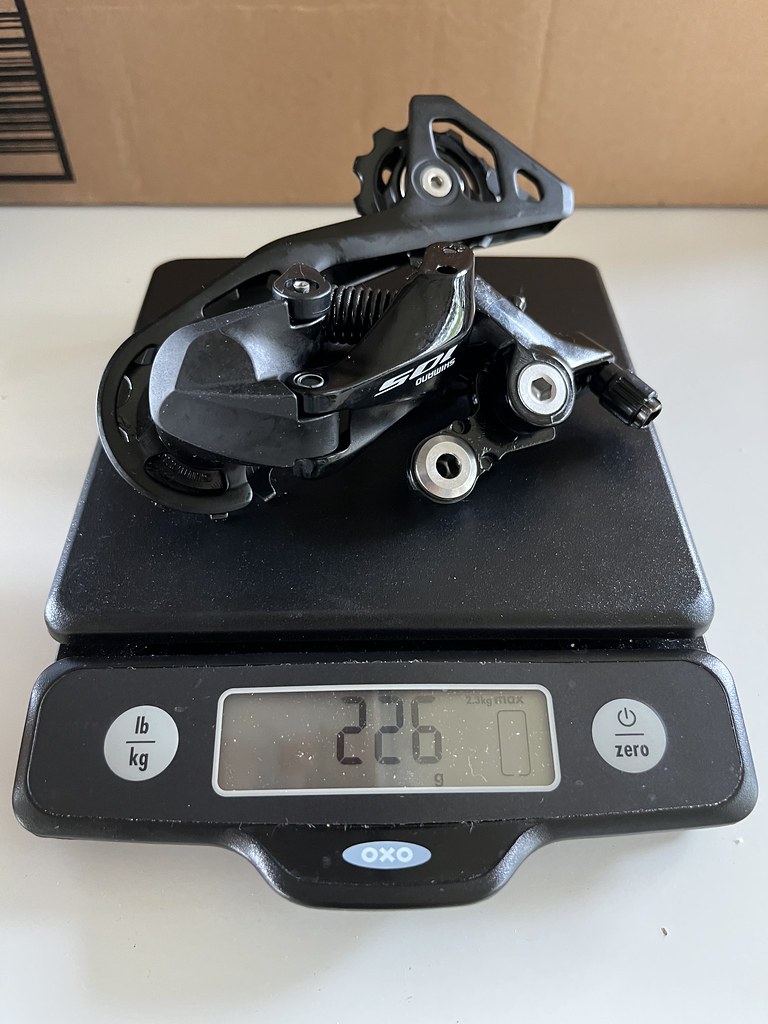
I didn’t take any pics after putting it on, but you’ll see it with together with the cassette soon.
OK, so the rest of the build I kind of did in an order that kind of combined a bunch of steps at once – so the rest below may seem a little out of order but that’s just how it went.
The next few steps involved setting up the wheels, tires, brakes, cassette all together. So here we go…
CABLES & HOUSING: Jagwire Universal Brake Kit & Pro Shift Kit
BOTTLE CAGES: Tacx Deva (sent these back)
TIRES: Vittoria Rubino Pro Graphene 2.0; 700x25c w/ yellow stripe
So if you’ve read any of my previous bike build posts, you’ll know that I am a stickler for good aesthetics. From frame color & design to component colors & shapes – everything has to jive just right, and fuck a murdered out black bike – gimme all the colors you got. As such, things need to match; highlights & main colors need to compliment each other, and sometimes another splash of a different colors makes things pop even more. That’s one reason I liked this frame – the color fade is pretty great. Sometime last year if you recall I built up the same exact frame for my buddy, in his size, and decided to use red as the highlight color. I didn’t want to do the same for my build, so I decided to go with yellow, which was the next color that would pop a little. I contemplated orange – and you all know how I love using Syracuse orange for my bikes, but there wasn’t enough true orange on frame to make a nice match.
Now, the next problem I had was matching yellows. Everyone’s version of how bright of dull or matte their yellow is is slightly different. I didn’t have this problem with the red! First thing I ordered was the cable housing – I went with the usual Jagwire universal brake kit in “carbon” color, and the Pro Shift cable kit in yellow. I decided to use yellow as the shift because, well, it wasn’t available as a color for the brakes, and this way I would get that little loop of yellow at the back of the bike where the cable goes into the rear derailleur. But I needed to make sure the yellow matched the yellow on the frame and the yellow on the other things I ordered.
The other things I ordered in yellow? Some bottle cages, and tires with a colored stripe. Now, I usually wouldn’t go for a gimmick like that but decided what the hell. (Note: it came out great this time, but when I replace the tires I’ll probably just go with regular straight black.) So the below pics are me taking pics comparing the yellows on each part to see if they were a close enough match to put on the bike.

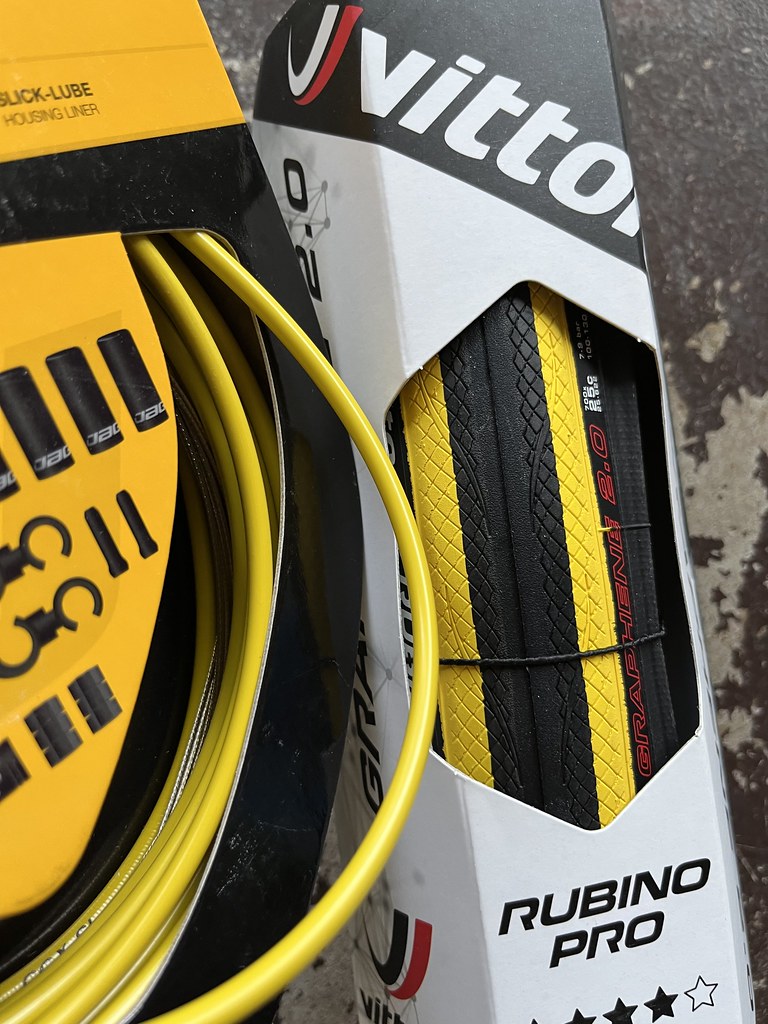

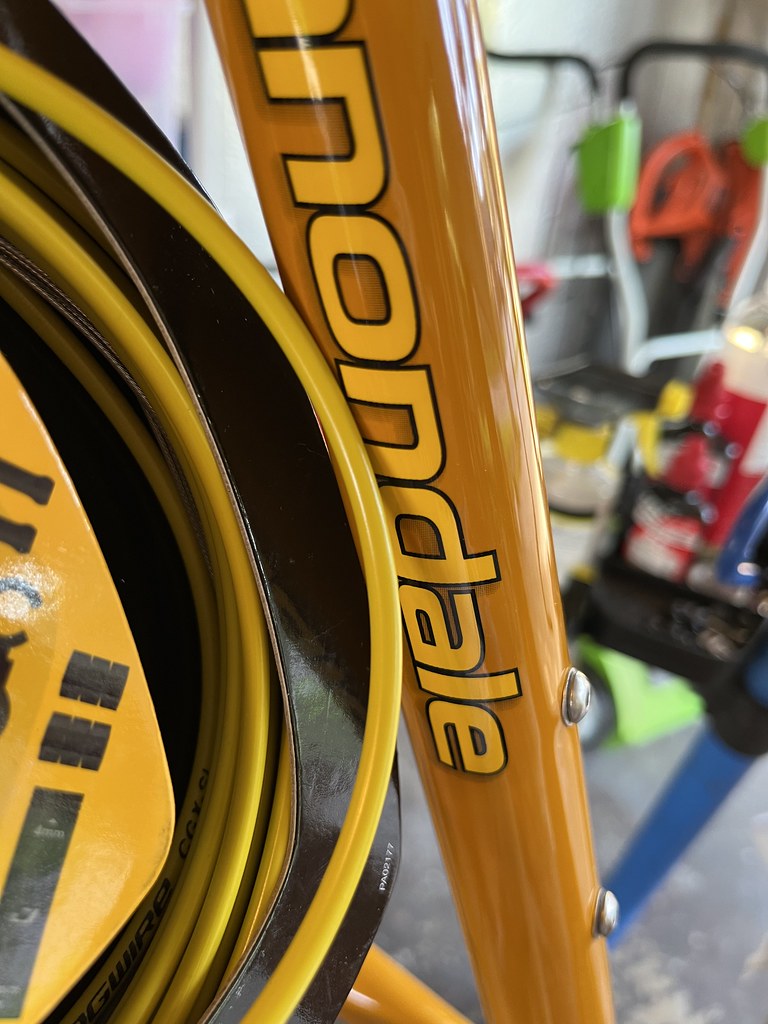
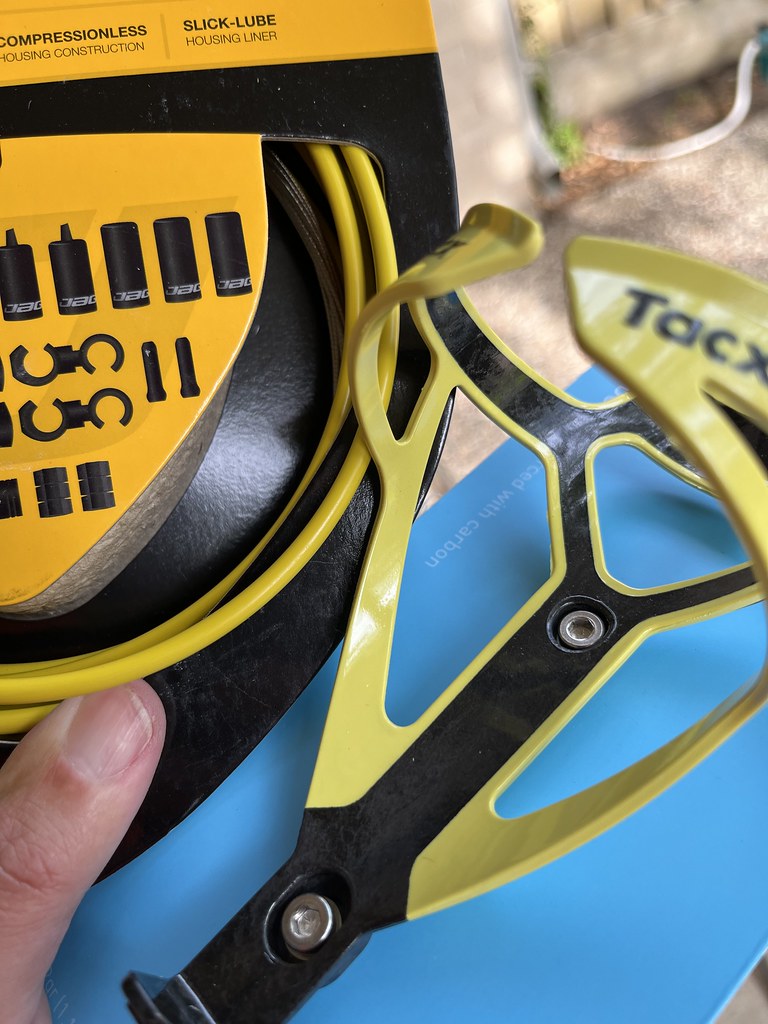

Thankfully, the cables & the lettings on the frame were a good match, as were the tires and the frame and the tires to the cable housing as well. The bottle cages were a big swing and a miss though; the yellow was too dull, and it looked really bad (this may not have translated as well in the pictures as it did to the naked eye). In the end I ended up grabbing some Supacaz Fly cages in the Zion color scheme – I like them but they are wearing pretty poorly (paint scraping off the inside too easily), so I will probably also ditch those at some point for some Arundel Mandible cages.

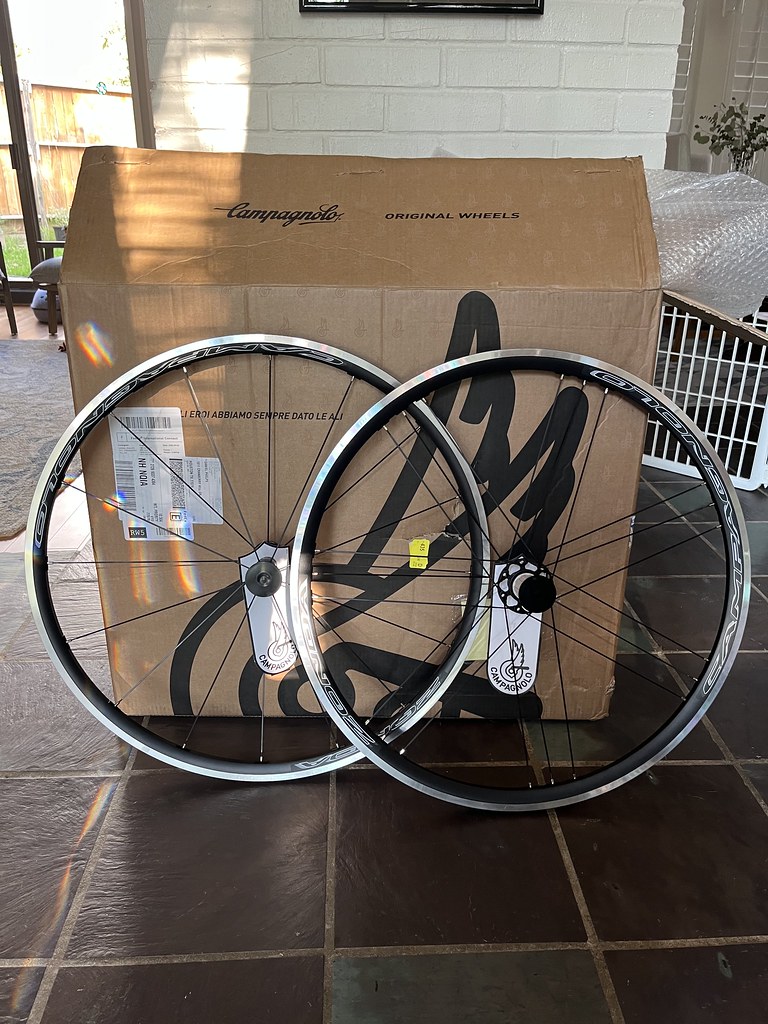
WHEELS: Campagnolo Zonda; 700c; 17mm internal rim width
Ok, so, now it’s time for wheels. If there was one piece I splurged on during this build, this was it. Any bike aficionado will tell you that the #1 place to shave weight off your bike is the wheels. The wheelsets that come with most bikes by default are solid, but hefty. Anyone who’s ever shopped for wheels knows that prices are crazy for light wheels (especially carbon). I set my budget at $350-$400 max for this, as I knew this would get me something way better than a typical $150 set, and not blow the bank on anything crazy.
On the suggestion from someone on Bike Forums, I went with a set of Campagnolo Zondas, shipped from the UK. I got them on sale as well, so they came in under my budget. And let me tell ya, they look awesome, and they’re light as hell for an aluminum set. I’m very please with them. I love the spoke patterns as well – you’ll see this better in the final build glamour shots.

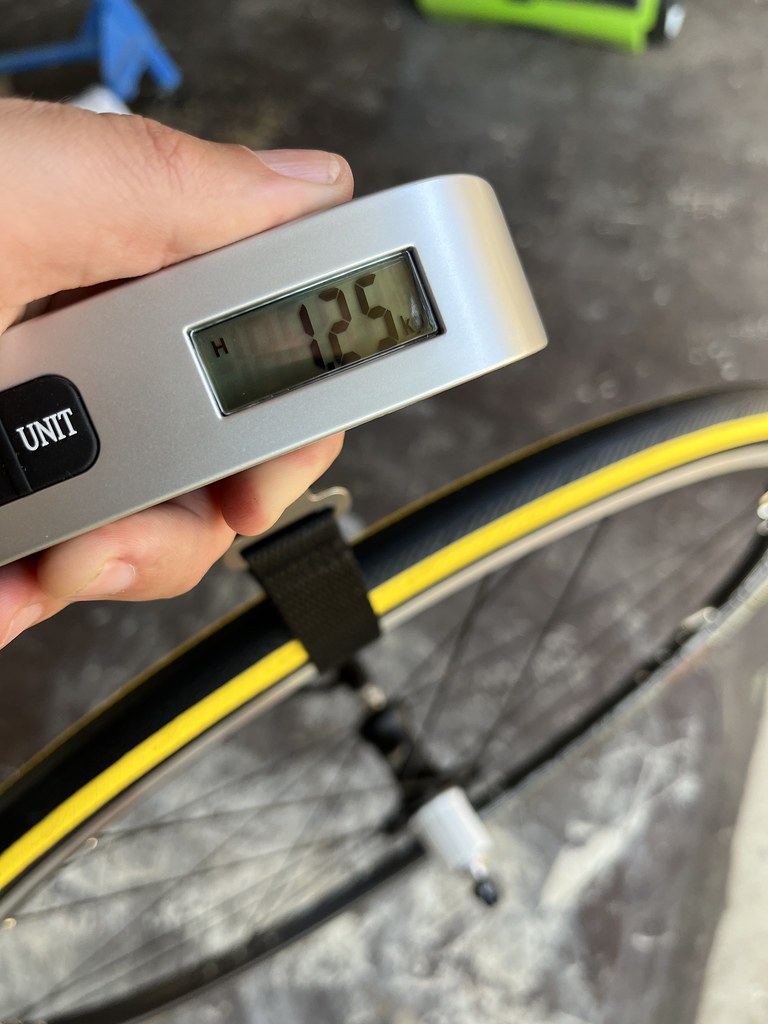
With the tires & tubes installed, the front wheel still only weighed in at just over 1,000g, and the rear at 1,200g. That’s just a hair over 5 pounds. Nice.
If you read my previous post about my buddy’s build, you saw me mention the tire clearance problem I had with the rear brake bridge. This was my first time running Vittoria tires so I didn’t know how their 25mm size compared to the Panaracers I usually use. Thankfully, these fit perfectly and left plenty of clearance between the top of the tire and the bottom of that stupid screw bulge on the brake bridge.
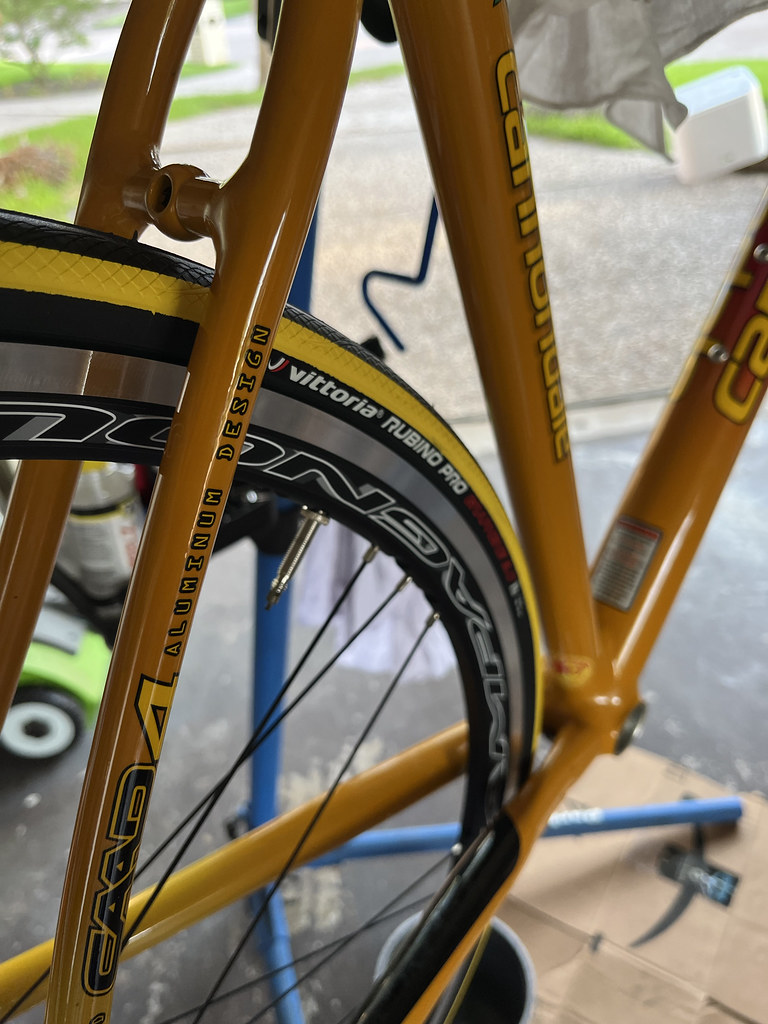
A 700x28c tire probably would rub on it again. However, because these Zonda wheels are a 17mm internal rim width instead of a historically typical 15mm, it gives the tires a little more volume so while the label may say 700×25, they ride most closely to a 28.
So now that I knew the wheels & tires were good and everything fit it was time to put on the brake calipers and the cassette.
CASSETTE: Shimano 105 CS-HG700 11-speed; 11-34t
I decided to get the the 11 speed cassette with the widest range of cogs so I had some climbing ability for whatever kind of rides I wanted to try in the future. The 11-34 cog cassette gave me the widest range possible in the 105 component level. The hitch is it requires the mid-cage version of the rear derailleur (mentioned above) in order to have enough travel, clearance and length to get the chain up around the biggest cog. The short-cage derailleur will handle up to the 32 tooth cog, but those extra 2 teeth make all the difference.


Installation is easy – just slide it onto the hub, and torque down the lock ring on the outermost cog. Done and done. Apparently I didn’t take any pics of that. Shrug? Now that the wheels were all set, I could get them set into the dropouts, and get to work on the brake calipers.
FRONT & REAR BRAKES: Shimano 105 BR-R7000 Dual Pivot Brake Calipers
Nothing special here either – just went with the brakes that go with the 105 groupset.


Looks like I didn’t take any pics of the rear brake. You’ll see it later anyway.
So now that everything that uses cabling was installed and ready to receive, it was time to get the stem, handlebars, and shifters mounted up and cabled – which is the most complicated & finicky part. I already had a stem on there to hold the front fork in place, but I hadn’t actually set it up properly yet.
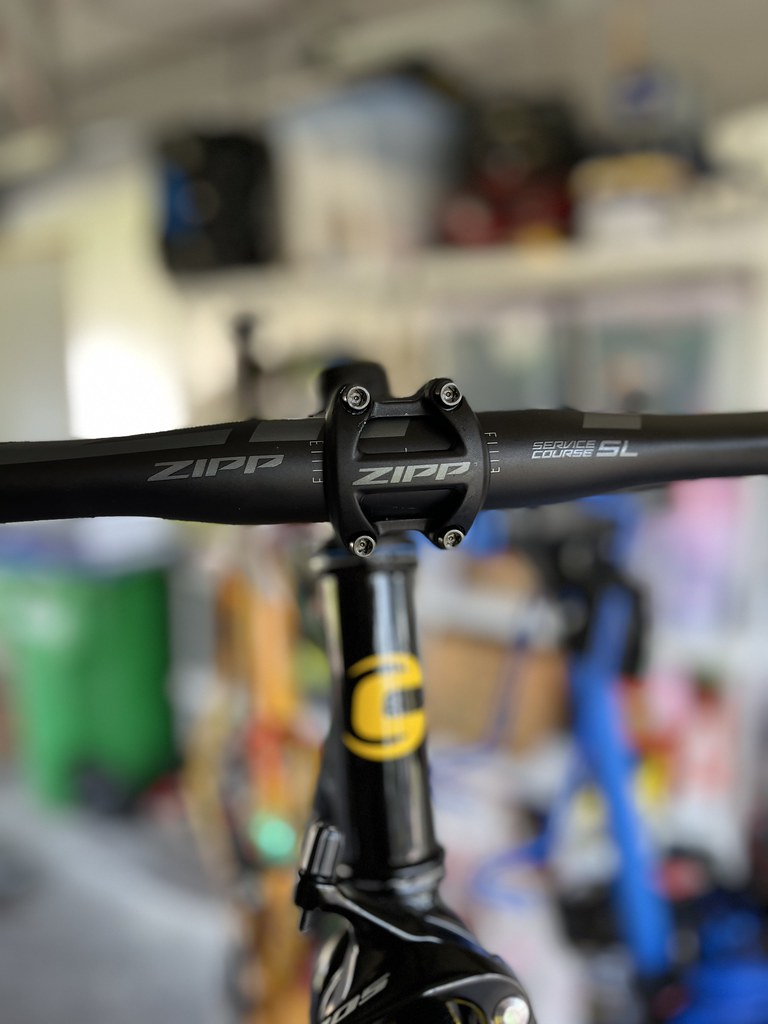
HANDLEBARS: Zipp Service Course SL-70 Ergo; 40cm width; aluminum
STEM: Zipp Service Course SL; 80mm, 17/-17°
I’ve been through a number of stems and bars between my various builds and I’ve got a bunch of favorites from various brands but I’m always on the lookout for something new, too. I searched for probably a few weeks going back and forth between various bars from Whisky, Ritchey, Thomson, Zipp, and a few others before settling on getting myself a Zipp cockpit. My OCD wanted to have complimentary bars & stem – and Zipp gave me what I wanted in the sizing I needed with the look I wanted.
I’m only 5’5″, so bike fit can be a challenge for me. I often need a much shorter stem than what comes stock, but after some testing I was able to settle on an 80mm length. I used a spare Ritchey stem I had in my parts bin that was also 80mm to do some testing for reach and part of that was deciding how much steerer tube I wanted to keep. My initial thought was to slam the stem as much as possible and cut the chimney off – but in the end, those few centimeters of further reach from keeping it lower just wasn’t the right fit. I ended up leaving all the steerer and buffering with spacers – turned out just fine. You’ll see that in some later pics – the below are from the “in progress” stage.


So one thing that really irked me was noticing a bit of a manufacturing defect on my stem. The clamp area wasn’t flush with the spacers in 1 spot. It kinda looked like it’s been ground down a little accidentally or something? I’m not sure. I contacted the retailer I bought it from but there wasn’t anything they could do since they didn’t have any more in stock and if I really wanted to try I’d have to contact Zipp and god knows how long it would take to send them the part back, have them sit on it for 3 months, then send it back. I wasn’t going without my bike for that long.

In the end I just decided to live with it, despite the fact I shouldn’t have to for something that cost over $100. Thankfully it’s on the non-drive side so it doesn’t show in pics and I don’t really ever see it when I’m riding, and it doesn’t affect any riding capabilities. So, just really annoying.
I’ll admit I spent way too much time deciding what bars I wanted. Plus once I narrows it down to the Zipp ones, I couldn’t decide if I wanted the normal ones, or the ergo ones, etc. I went back and forth, looking at aesthetics and sizing. I decided to go with the ergo shape because I wanted to have more comfort on the tops. I don’t ride there very often, but when I do I find most typical round bars feel pretty hard no matter how plush the bar tape is. I’d never had ergo bars before so I also figured what the hell? (btw, so far I love them)

They have a pretty short reach at 70mm, and a moderate drop at 128mm. They aren’t carbon because who can afford that shit. I also quite like the very ever so slight 3 degree backsweep. It’s barely distinguishable when your riding, but you can feel it a little but in the reach. But the main difference is that flattened portion along the tops from the center to the bends.
SHIFTERS: Shimano 105 ST-R7000 – 2×11 speed (rim brake)
Obviously these were a no-brainer because I was updating the entire groupset to be matchy matchy. Sadly, these are the most expensive part of a groupset. This was actually my first time cabling on a set of 105 shifters – my previous 105 Roubaix was equipped with and earlier model, and I never had to mess with them before the frame cracked. Cabling them was not the easiest, but not impossible. The most annoying part was peeling back the rubber hoods enough to get the wrenches and the cables in – and I’m always afraid that I’ll stretch the rubber and it won’t look perfect when I flop it back.
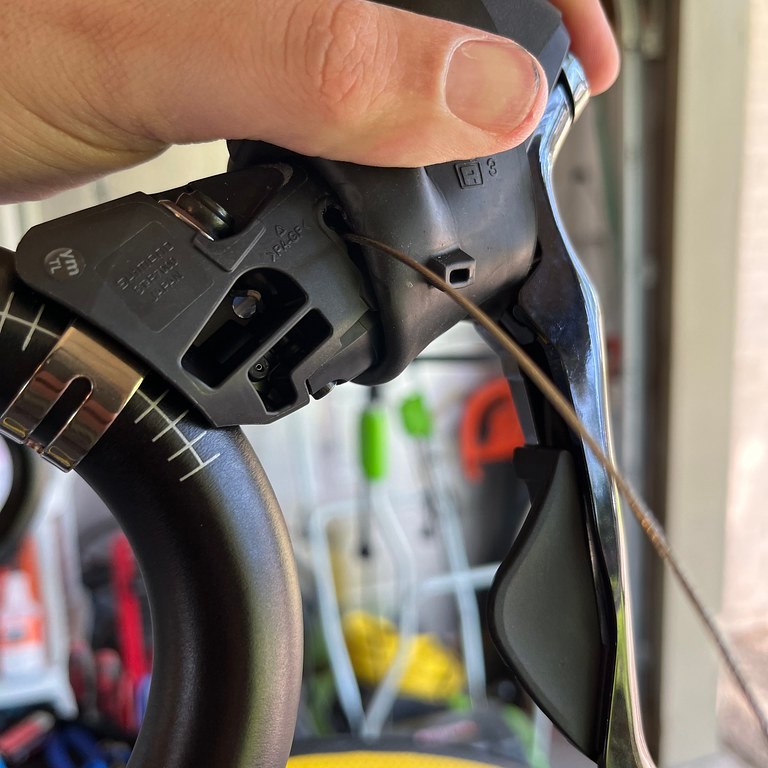
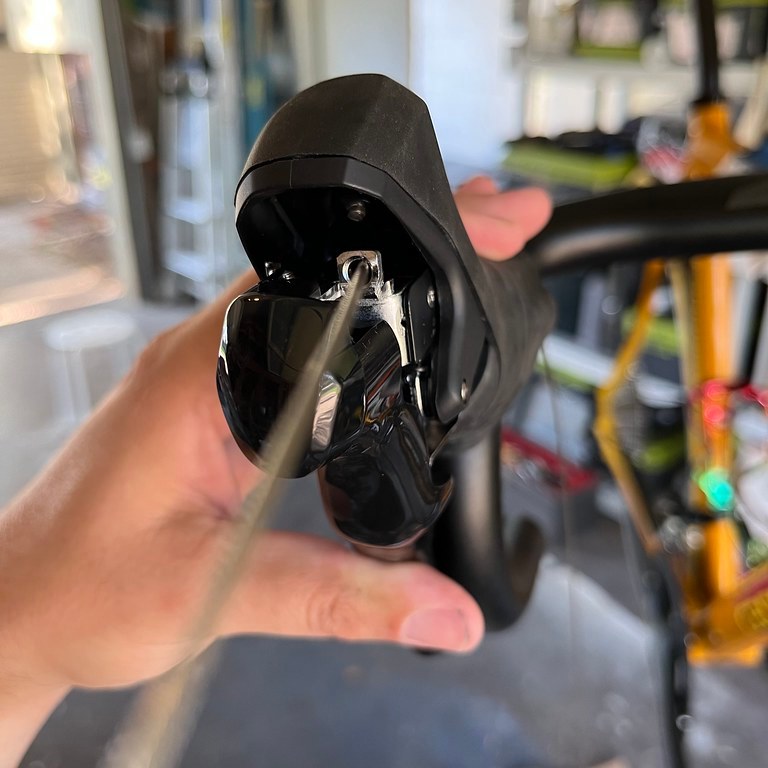
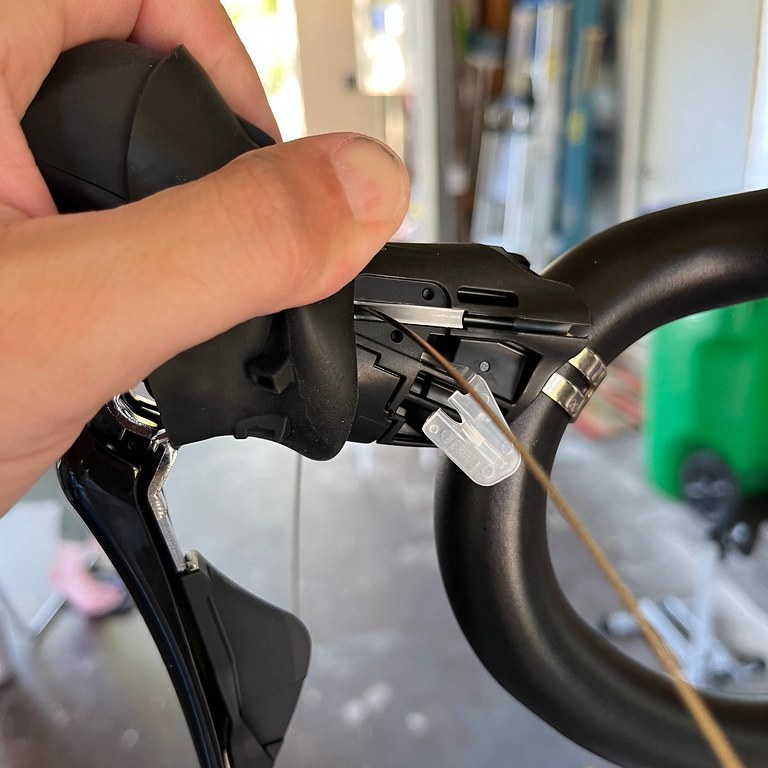


Once the cables were through, doing the brakes is a piece of cake – I didn’t take any pics of that. The derailleurs are a little more complicated. The rear is usually not too bad – it depends on how the thing takes the cable and where it goes in/out. But goddamn was that front derailleur a pain in the ass. It’s way more complicated to the simple pull-systems of the older styles I am used to working with on vintage bikes. This 105 version had you stringing the cable up through and then wrapping it around and down and then you had to trim the shifter so it didn’t do half steps or some other stupid shit and I was just holy crap guys why is this so frickin’ complicated now? Just let me the cable pull it to the outer ring, or slack it to the inner ring.


The above pics are only half way through the cabling process. It still needs to wrap around, and then there’s a cap you snap back on. Just dumb design. Whatever.
Thankfully the rear derailleur was not hard to cable.


Once the derailleur was cabled, it was time to get the chain on there any set the proper chain length. Of course even before that I started clicking the shifter back and forth so I could get the derailleur aligned with the cassette as much as possible before actually putting the chain on. Obviously eyeballing it isn’t perfect but it’s a great start.
This always makes me nervous because if I get it wrong I have to buy a new chain – and lately they ain’t as cheap as they used to be. Obviously only if I get it wrong by making it too short. Anyway, I took a bunch of pics of the chain in the major positions you need to be correct in: big/small, small/small, & big/big. The first is mostly to see if it hangs about where it’s estimated, but its the other 2 that are super important. Small/small has to be just right or the derailleur arm won’t have have enough tension on the chain and it can get floppy and sloppy and fall off easily – plus you don’t want the jockey wheels getting tangled with the cassette.

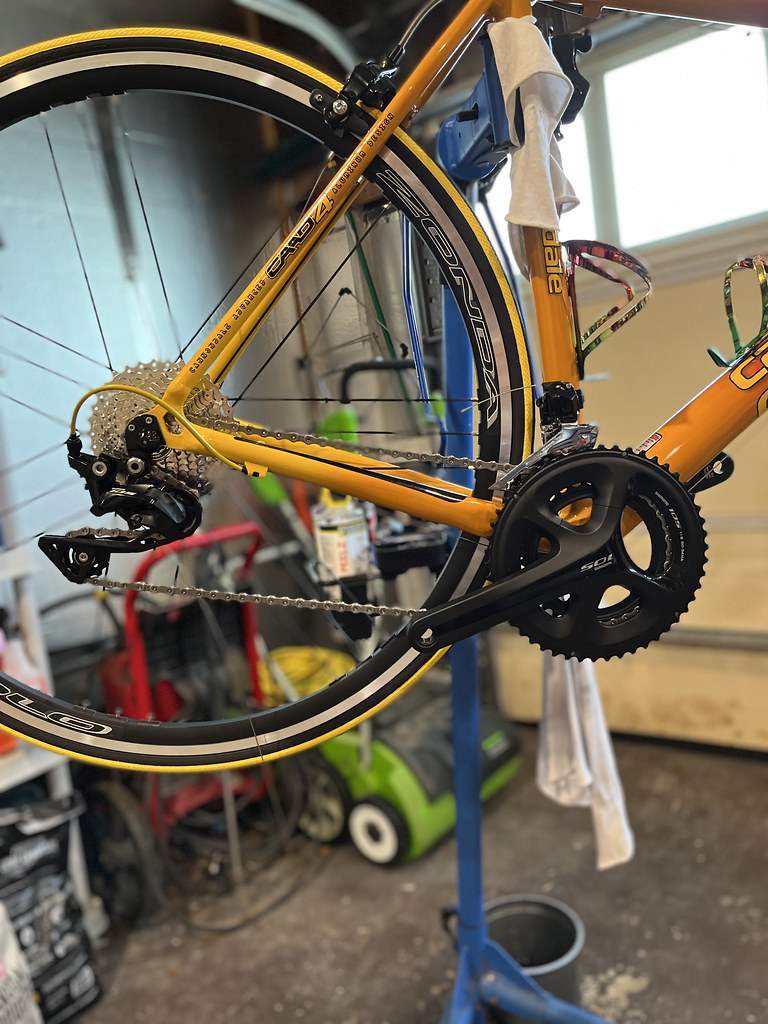

Big/big is also important because if your chain is too short you will put too much tension on the derailleur arm pulling forward and it can break it. Thankfully, most people won’t use this combo because if you’re in the biggest cog in the back you’re most likely going up a steeper hill and will have already shifted down into the small ring up front – but, you still gotta make sure it works! The 3 pics above are all of these different positions so you can see where the derailleur arm rests – and that big/big one is about as much as I can go stretching that arm forward.
It took a bunch of fooling around with the limit screws on both the front and rear derailleurs to get things to shift smoothly without any clickety clackety noises or skipping gears. Plus, you gotta try to eliminate as much chain rubbing on the front derailleur as you can – but man it’s just not always possible and I give up. Even now I still have some rubbing in the front when I go down far enough into the faster gears. I messed with it for over and hour and still couldn’t get it to be silent because usually if I moved the cage too far outboard, the chain would just rub on the inside of the cage when I shifted into larger cogs. So, it is what it is and like I said I give up. Thankfully, I trimmed the chain in a good spot and I didn’t have to shell out another $60 to replace it. (It’s a Shimano 105 chain btw)
So that pretty much wraps up the build. The last little thing I did for myself was order some custom stem caps from Stem Caps.com. This was just a personal touch, really. I searched a bunch of different options and decided to go with these and so far I’ve been very happy wth tm and recommend them to you. I liked that they were easily interchangeable if you had more than one design idea (I did) and since it was a separate piece that clipped onto the actual stem cap, the bolt was hidden and also allows you to use the entire space for your design – not design around a center stem bolt. The guys I worked with over email to get my design just right were super helpful and really loved my unique ideas.

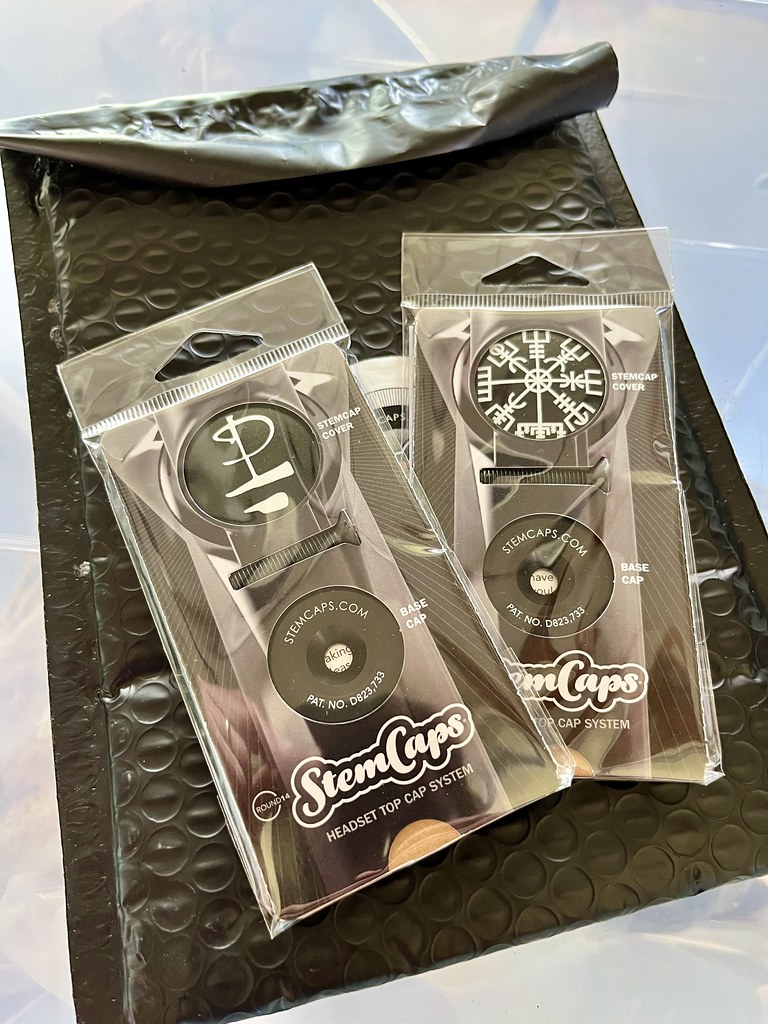
They come with a bolt and a cap, and are nicely packaged so you don’t have to worry about losing one when you swpa them out. The 2 I got are personal in nature – the Pink Floyd Boatman logo, and the Icelandic stave Vegvisir; a magical rune that helps travelers find their way home safely, especially in bad weather. I also have a 3rd one I don’t have a picture of, but I will for the final reveal post. It has to do with the name of the bike.
Oh, and these stem caps are super easy to put on and take off. Install it like a normal top cap, then the picture part snaps into place. Push down on the center to pop them off. So easy.
Only thing left to do was to wrap the handlebars – that’s hard to document without that damn things unwrapping when you take your hands off it, so you’ll have to wait for the glamour shots to see the finished product. But, I of course went with my absolute favorite tape: Arundel Art Gecko, which gives the bike some flare, and also pays homage to one of my favorite artists: MC Escher.
OK so that’s my dream bike build. Of course there was one thing left for me to do:

18.1 pounds. Not too bad for a 2001 bike, before carbon became the super lightweight mainstay. And honestly it’s lighter than many of today’s bikes with disc brakes and certain frame designs. I know I can make it evern lighter by switching to a carbon seatpost, or carbon bars & stem. I don’t have any plans to do that at the moment, but I bet if I wanted to I could get it down to around 16 pounds. And that’s pretty badass.
Stay tuned – the next post will be the big reveal of how it looks. I could put some pics here but this post is already waaaayyyy longer than I anticipated and I applaud and commend and thank you if you actually made it all the way through to here.
Oh ok, here’s a sneak peek, until next time!….


beautiful